
Tin Can Tea Light Holders
Yesterday for my Wordless Wednesday post, I posted this picture.
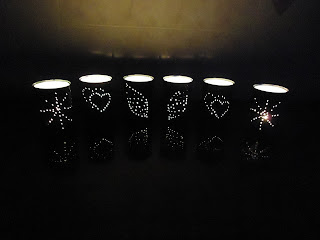
These are tin can tealight holders which I am giving to Daddy for our Tenth Wedding Anniversary next Thursday. I thought it rather apt because the tenth wedding anniversary is marked with a gift of tin and I've ten of them (four of them are hiding as Daddy needs a bit of a surprise right?). I had originally seen Tea Lights Holders similar to this on Pinterest and really wanted to make my own and so here is how to do it.
First of all do the world a favour and save some tin cans from being recycled into more tin cans. Make sure you really clean them up inside and out as you need to remove the label and the sticky glue and any traces of food from inside the tin. I ended up soaking mine in the sink over night and using a bit of WD40 on the sticky glue bit! If you end up using the WD40 too then make sure to really clean it all off as it will effect a later step.
Once they are all dry fill the tin cans with sand and then add water before putting them in the freezer. The sand allows the water in the tin cans to freeze but not to lose shape. You will use more sand than you think as you will need to compress the sand down like when you are building a sandcastle. I wasn't sure how long it would take for the cans to freeze and so I left mine for 24 hours. This was way longer than needed though, as they only took a couple of hours really. I had decided to go with a few different designs on my tin cans as I am hoping to use them at different times of the year and not just in the summer. I drew my designs on to greaseproof paper and then wrapped the paper around the can. I found that the tighter the paper around the can the easier it was to hammer our the design. The towel by the way was to protect my bunkers/work surfaces!

All you have to do is gently hammer a nail into the can around your sketch. I found that it was simple shapes that worked best and I think the double hearts and the stars look the most delightful twinkling away. I did think that I would have to work quickly because I was worried that the cans were going to defrost before I had finished, but as you can see from the next picture they were still very frozen.

I let the cans defrost in the sink and then gave them a good wash and let them dry before spraying the inside with a white aerosol paint can. The white paint is best as it reflects the light from the candles, and I think it looks neater too.
There are three points to this painting stage. The first being wear gloves when doing this as aerosol paint suitable for outdoor use is a pain to get off. The second thing always spray the can down wind of you, I learnt this after the first spray in the first can and let nothing more be said of this. The last point is spray paint smells good, but don't sniff it because that is bad.

After the insides were dry I spray painted the outside. Daddy had brought me blue and green to go with our garden (green and brown would have been better!) and so a few coats later we ended up with these! It was too late to respray the insides, but they needed it from where the outside had bled a little over the lip of the cans and so I sprayed them again a couple of days later.

The only other issue was that the layers of paint had covered up a few of the holes I had made, so I quickly cleared the clogged up paint by just poking a nail into the holes and giving a little wiggle. And so there you have it Tin Can Tea Light Holders, perfect for tea lights or Votive candles.